Below, we continue the work on our terrasse area. much of it is repeated from earlier posts, but will complete the transformation process. Next time will be mostly be fresh mini projects within the work. Sorry for the formatting differences, but the blogger software does not want to cooperate right now.
Terrasse walls cleaning and prep
We cleaned the walls of the barn (terrasse) earlier with small pressure washer and it was time to tackle the "conservatory". Pat calls it that since we had clear panels inserted in the roof shortly after we returned. Amazingly bright and airy with the roof 25 feet tall at the high point. The difference now was the conservatory doesn't drain like the terrasse level did. This means all the water used to wash the walls must be manually removed. This was accomplished with a squeegee and a shop vac. I worked the ladder and washer and Pat worked the squeegee and the shop vac.
 |
| Cleaning the "brick" wall side |
 |
| And the rubble walls |
 |
| The bottom had a render |
 |
| All clean |
 |
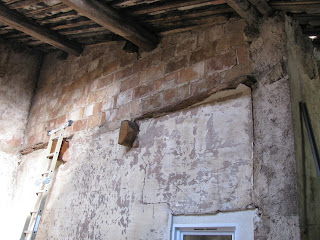
| Exposed bricks above the salon |
 |
| Before and After |
Except for the very high places, it was reasonably easy to remove decades and decades of dust, spider webs and lint. I am sure the walls had never been cleaned since they were rendered. The lower walls had a concrete lime render but above 3 meters on one wall there was nothing except the bricks used to build the wall on our third level. It made quite an unusual pattern and we may leave it for interest or paint it the same as the other walls.
First Skylights
Because it was very dark in the space, we
decided to put in skylights. David Vidal installed two clear cellular panels
similar to those used in greenhouses here. They let all the light through
albeit diffused. He first removed all the roof tiles over the area and followed
by removing half the chevrons (rafters) he laid the panels over a center beam
and mortared up all around the edges. He then replaced tiles over the
surrounding areas. And we had a lot of light in the entire area which was
critical to working later.
 |
| Clear cellular panels |
 |
| Barely visible from the street |
 I tried for several hours on different attempts to repair a threshold to the terrasse area. I tried to cut and fit wood to rebuild an old wood threshold complete with a drip ledge to shed any rain or water. It was not possible given my meager talents.Then in a stroke of genius (or blind luck) I decided to try my hand with a concrete product for the first time on detail work. I previously had only poured simple slabs and while not particularly proud of this work, it is totally in keeping with an old house.
The problem with wood was it would not conform to the twists and turns of the floor and wall and difference in heights. Mortar, on the other hand, is molded to the situation. After summoning all my courage, I formed up, mixed a batch, and fashioned a perfect (almost) threshold. Even Jake liked it as you can see as he stamped his own autograph to my work.
 I later added some terre cuite "nez de marche" (terra cotta tile nosing) to cover the rough ancien concrete step.
We are making steady progress on the new room Pat calls the conservatory. The roof is about 19 feet high at its highest and we are trying to break it visually into segments design wise. Otherwise it is just a vast expanse of blank walls. I have fashioned some columns to help create some contrast and dimension on the flat walls. The columns also serve to hide the wiring that will come later. It is all done in bricks of various sizes and has footer and a header with a chapeau and crown molding at the top.
We are having the walls rendered (plastered) up to 3 meters high. this will create architectural interest as the walls and the columns will be finished in a different color.
A border of faux bricks is planned around the top to separate and the upper part will get some paint. In preparation for this, I had to run the electrics to provide a smooth finished product. With my mortar buster, I channeled out a canal to place the wires in which will be covered up later when we finish the walls. I also placed the boxes in mortar so they are sturdy when using them later.
A border of faux bricks is planned around the top to separate and the upper part will get some paint. In preparation for this, I had to run the electrics to provide a smooth finished product. With my mortar buster, I channeled out a canal to place the wires in which will be covered up later when we finish the walls. I also placed the boxes in mortar so they are sturdy when using them later.
Before the conservatory walls were rendered, we had to do all the rough in work for electrics, plumbing and decor. 

As before, we needed to hide the electrics, so we chose to add some faux columns that would not only hide the wires but also provide a visual break to an otherwise large wall. I used terra cuite bricks and stuck them to the wall with Mortar Adhesive (MAP). They are hollow inside to accommodate the wires and lightweight and easy to handle until an uneven wall is found. Then you can have a lot of fun lining them up.
There was also a rough timber laying between the floors on one side of the room. It protruded into the conservatory and provided no benefit so it had to be removed.
 My Dewalt cordless was no match for very old wood and most of it came off a chip at a time with a hammer and chisel.
Rendering the walls
The next step is to finish the walls in the interior room. Negotiation is the same here as anywhere but maybe worse because an English speaker is considered vulnerable and ignorant with money in the bank to the Macons (contractors) It is a struggle but you can negotiate to something approaching a fair price. And so it was with David Touche. We argued for about 40 minutes before he relented and gave me a fair price.
They started by forming up the area to be covered 3 meters high and added a greage mesh to hold the scratch coat. The crepi went on in three passes: a scratch coat of beton (concrete) followed by a finish coat of fine grit cement/plaster that is worked until smooth and a final coat of any contrasting features, in my case, the columns were white and the walls were a very light tint of green. They then take a big hose and a powerful concrete pump and spray the walls. I have seen this done on gunite pools in USA. One man sprays and the other works it into the mesh and wall with a large flat trowel.
They then must let it dry/cure before the finish coat is applied.
 |
| David and Jean Loup blowing crepi |
During the process, David's father died and we have endured several delays.


 The preliminaries are complete and the crepi guys blew the walls and covered all my sins. Afterward it is just necessary to set the outlets and switches.
After the crepi guys were finished, I commandeered their scaffolding and persuaded one of them to paint the walls above the bricks and crepi.
I rented a good spray rig and the lad did a good job from the scaffold at heights of about 6 meters. Money well spent as I am not good on ladders or great heights!!
To further create visual interest, I set a brick border around the room at about 3 meters high. Again, these were very easy until a curvy wall is found. The only choice then is to hack down a hump or fill in an indentation. In rubble walls, nothing is ever straight, plumb or smooth because of the underlying stones that are used. The brick border is only three bricks high, but it provides a visual vertical break as well as a welcome color contrast.
I rented a good spray rig and the lad did a good job from the scaffold at heights of about 6 meters. Money well spent as I am not good on ladders or great heights!!
 |
| Setting faux bricks for the border |
To further create visual interest, I set a brick border around the room at about 3 meters high. Again, these were very easy until a curvy wall is found. The only choice then is to hack down a hump or fill in an indentation. In rubble walls, nothing is ever straight, plumb or smooth because of the underlying stones that are used. The brick border is only three bricks high, but it provides a visual vertical break as well as a welcome color contrast.

After the conservatory shaped up a bit, we migrated toward the terrasse. Our plan was to have an "inside" room (the conservatory) and an outside terrasse. But we wanted a good "flow" for entertaining year round. The solution was a glass wall with sliding doors that would separate the rooms when necessary and connect the rooms for optimum circulation. Mssr. Roque from Roujan offered a good bid to accomplish this work and they were very prompt, professional and courteous.
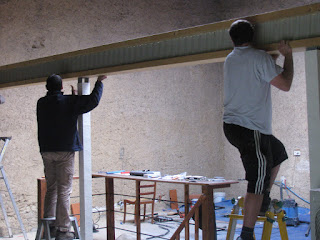
To span the opening of some 6 meters, a new beam was required.
 |
| A little planning is always good |
 |
| Strong backs |
 |
| Setting the top frame |
 |
| Fine adjustment with an angle grinder |
 |
| Make sure it's level |
 When they returned they completed the structural bits and proceeded to set the fixed panels above and finally the sliding doors at the bottom.
 |
| Completing the framing |
 |
| Setting the fixed panels |
 |
| Setting doors |
 |
| Covering the work |
 |
| Almost there |
 |
| Voila! |
Next, we begin the process of making the two rooms livable and functional.
Stay tuned.....
Stay tuned.....


